Amazon Web Services
Private Cloud
Amazon Linux
EC2 Spot Instance
Example prices 2017-04-17
| Instance type | vCPUs | Memory (GiB) | Storage (GB) | Network | Spot price | Spot savings |
|---|---|---|---|---|---|---|
| c3.large | 2 | 3.75 | 2 x 16 | Moderate | $0.0222 | 83% |
| c3.xlarge | 4 | 7.5 | 2 x 40 | Moderate | $0.0431 | 83% |
| c3.2xlarge | 8 | 15 | 2 x 80 | High | $0.1164 | 77% |
| c3.4xlarge | 16 | 30 | 2 x 160 | High | $0.2436 | 76% |
| c3.8xlarge | 32 | 60 | 2 x 320 | 10 Gigabit | $0.3842 | 81% |
Docker
Rocker Rstudio: Initial Setup and Connect
DNS
- set DNS configuration for
rstudio.rdata.workto A record IPv4 address with assigned EC2 Elastic IP - set back to CNAME after terminating the EC2 instance
Server
- launch new instance using existing keypair
- add TCP port
8787using ‘Security groups’, ‘launch-wizard-[x]’-
- edit
Inbound - Type:
Custom TCP Rule
Protocol:TCP
Port Range:8787 Source:anywhere->0.0.0.0/0`
- edit
-
- go to ‘Elastic IP’, associate IP
35.157.60.165with new cloud instance
Client Terminal
- navigate to folder containing keypair:
$ cd ~/Dropbox/Logins/Amazon/EC2 - remove connection from
/home/xps13/.ssh/known_hosts - connect to instance using
$ ssh -i "ami-ca46b6a5-rstudio.pem" ubuntu@ec2-35-156-206-85.eu-central-1.compute.amazonaws.com - install docker
$ curl -sSL https://get.docker.com/ | sudo sh - install docker image
$ sudo docker run -d -p 8787:8787 rocker/hadleyverse - get container id:
sudo docker ps sudo docker exec -it <container-id> bash
install missing packages
cd /tmp
wget https://dl.dropboxusercontent.com/u/1807228/install-packages.R?dl=1 -O install-packages.R
R CMD BATCH install-packages.R
download bootcamp.zip to /tmp folder
cd /tmp &&\
wget https://dl.dropboxusercontent.com/u/1807228/bootcamp.zip?dl=1 -O bootcamp.zip && \
unzip bootcamp.zip -d ../home/rstudio/ && \
chown -R rstudio: /home/rstudio
create user accounts, unzip course material to /home/$USER folders and allow users writing to location bash createuser.sh, e.g. chown -R training01:training01 /home/training01
cd /tmp && \
wget https://dl.dropboxusercontent.com/u/1807228/createuser.sh -O createuser.sh && \
bash createuser.sh
Client Browser
- navigate to URL http://
:8787/auth-sign-in, e.g. http://35.157.60.165:8787/ - main user:
rstudio, password:rstudio - training user:
training01, password:train01
Management Console
Create an Amazon EC2 Key Pair and PEM File
Amazon EMR uses an Amazon Elastic Compute Cloud (Amazon EC2) key pair to ensure that you alone have access to the instances that you launch. The PEM file associated with this key pair is required to ssh directly to the master node of the cluster.
To create an Amazon EC2 key pair:
- Go to the Amazon EC2 console
- In the Navigation pane, click Key Pairs
- On the Key Pairs page, click Create Key Pair
- In the Create Key Pair dialog box, enter a name for your key pair, such as, mykeypair
- Click Create
- Save the resulting PEM file in a safe location
Modify Your PEM File
Amazon Elastic MapReduce (Amazon EMR) enables you to work interactively with your cluster, allowing you to test cluster steps or troubleshoot your cluster environment. You use your PEM file to authenticate to the master node. The PEM file requires a modification based on the tool you use that supports your operating system.
AMI
- RStudio_AMI
- url: http://www.louisaslett.com/RStudio_AMI/
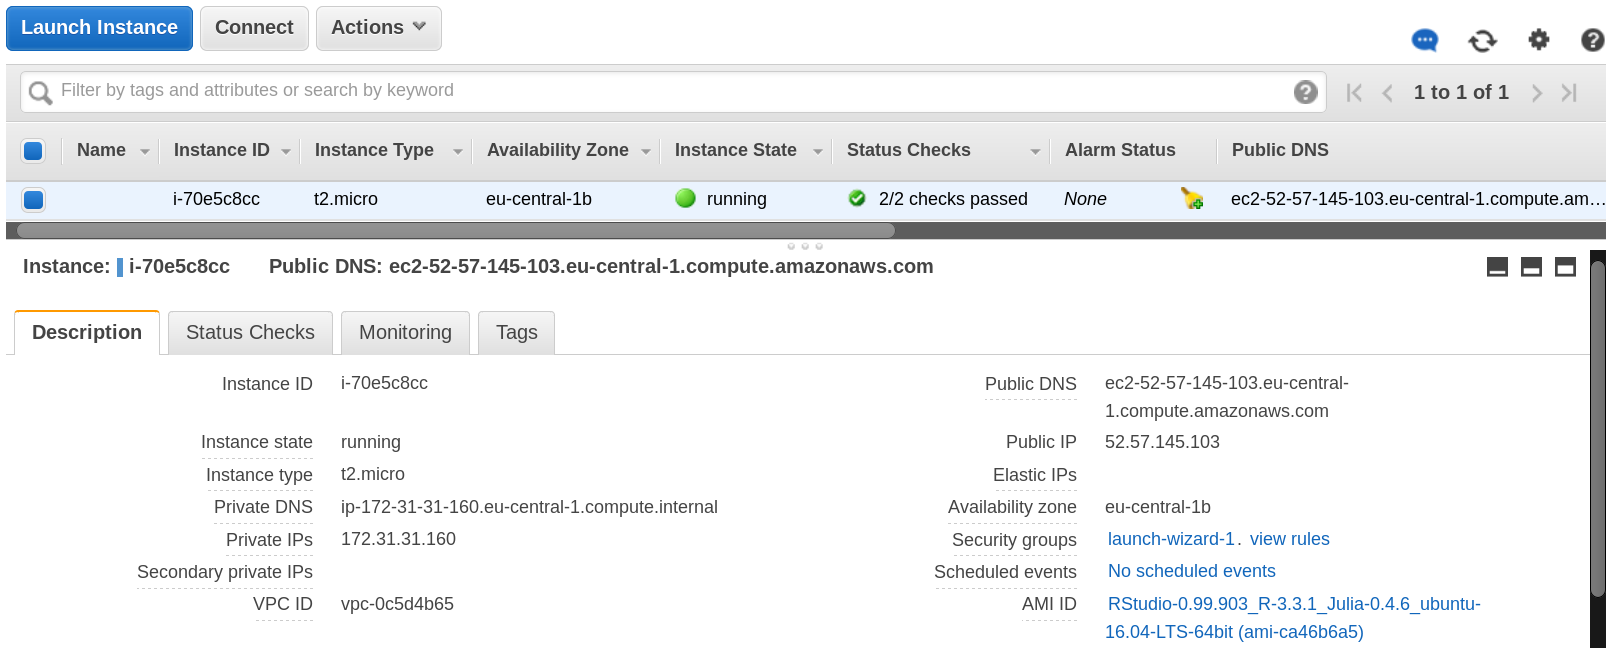
EU Central, Frankfurt: ami-ca46b6a5 RStudio 0.99.903
R 3.3.1
Ubuntu 16.04
Username: rstudio
Password: rstudio
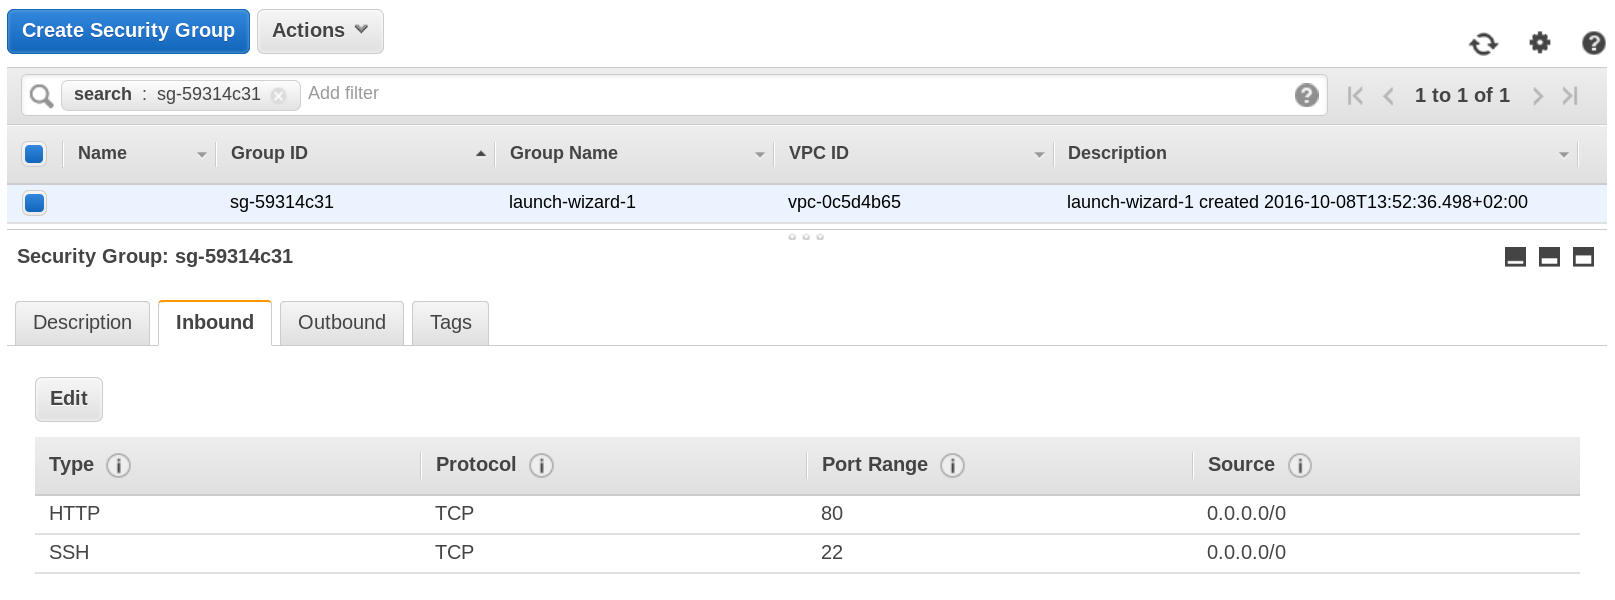
After the instance has been started successfully, inbound http access must be enabled. Click on Security groups
launch-wizard-1 in the instance description

Select the Inbound tab in the Security Group and edit the table.

Add HTTP to the table and accept the default configuration.

AWS CLI
- install using
pip $ sudo pip install awscli- create ec2 skeleton and save to a file
$ aws ec2 run-instances --generate-cli-skeleton > ~/src/scala/sparkDemo/ec2runinst.json- run instance using JSON configuration
$ aws ec2 run-instances --cli-input-json file:///home/xps13/src/scala/sparkDemo/ec2runinst.json
{
    "DryRun": true,
    "ImageId": "ami-dfc39aef",
    "KeyName": "awscli-ec2key",
    "SecurityGroups": [
        "my-sg"
    ],
    "SecurityGroupIds": [
        "sg-28c21351"
    ],
    "InstanceType": "t2.micro",
    "Monitoring": {
        "Enabled": true
    }
}
- create key pair (EC2 Dashboard: Network & Security: Key Pairs)
$ aws ec2 create-key-pair --key-name awscli-ec2key --profile root- create security group (EC2 Dashboard: Network & Security: Security Groups)
$ aws ec2 create-security-group --group-name my-sg --description "My security group" --profile root- run instance
$ aws ec2 run-instances --cli-input-json file:///home/xps13/src/scala/sparkDemo/ec2runinst.json --profile root- create emr skeleton
$ aws emr create-cluster --generate-cli-skeleton
create spark cluster
$ aws emr create-cluster \
    --name "Spark cluster" \
    --release-label emr-5.0.0 \
    --applications Name=Spark \
    --ec2-attributes KeyName=awscli-ec2key \
    --instance-type m3.xlarge \
    --instance-count 3 \
    --use-default-roles`
- stop cluster
$ aws emr terminate-clusters --cluster-ids j-91BR4ANV6I1J
S3
Static Websites
To host your static website, you configure an Amazon S3 bucket for website hosting and then upload your website content to the bucket. The website is then available at the region-specific website endpoint of the bucket:
<bucket-name>.s3-website-<AWS-region>.amazonaws.com
For a list of region specific website endpoints for Amazon S3, see Website Endpoints. For example, suppose you create a bucket called examplebucket in the US East (N. Virginia) Region and configure it as a website. The following example URLs provide access to your website content:
This URL returns a default index document that you configured for the website
http://examplebucket.s3-website-us-east-1.amazonaws.com/
Example: epfl-observatory
http://epfl-observatory.s3-website.eu-central-1.amazonaws.com
s3a Storage
- add to
libraryDependsinbuild.sbtfile mvnrepository.com: org.apache.hadoop: hadoop-aws - see also github: Aloisius: hadoop-s3a
    val hadoopConf = sc.hadoopConfiguration
    hadoopConf.set("fs.s3a.impl", "org.apache.hadoop.fs.s3a.S3AFileSystem")
Alternatively, one could set spark.hadoop.fs.s3a.impl=org.apache.hadoop.fs.s3a.S3AFileSystem in the spark.properties configuration file.
The hadoop-aws module provides support for AWS integration. The generated JAR file, hadoop-aws.jar also declares a transitive dependency on all external artifacts which are needed for this support —enabling downstream applications to easily use this support.
Features:
- The “classic” s3: filesystem for storing objects in Amazon S3 Storage
- The second-generation, s3n: filesystem, making it easy to share data between hadoop and other applications via the S3 object store
- The third generation, s3a: filesystem. Designed to be a switch in replacement for s3n:, this filesystem binding supports larger files and promises higher performance.
Manage S3 access using IAM Policy Variables
- IAM Policy Variables Overview
- IAM Policy Elements Reference
- AWS IAM API Reference: Actions and Condition Context Keys for Amazon S3
Policy to access buckets and objects in buckets
{
    "Version": "2012-10-17",
    "Statement": [
        {
            "Sid": "ListAllBuckets",
            "Action": "s3:ListAllMyBuckets",
            "Effect": "Allow",
            "Resource": "*"
        },
        {
            "Sid": "TradeBucket",
            "Action": [
                "s3:*"
            ],
            "Effect": "Allow",
            "Resource": [
                "arn:aws:s3:::ir-comext-1",
                "arn:aws:s3:::ir-comtrade-1",
                "arn:aws:s3:::ir-faosws-1"
            ]
        },
        {
            "Sid": "TradeBucketObjects",
            "Action": [
                "s3:*"
            ],
            "Effect": "Allow",
            "Resource": [
                "arn:aws:s3:::ir-comext-1/*",
                "arn:aws:s3:::ir-comtrade-1/*",
                "arn:aws:s3:::ir-faosws-1/*"
            ]
        }
    ]
}
test access in databricks platform
val logFile = "s3n://[AWS_ACCESS_KEY_ID]:[AWS_SECRET_ACCESS_KEY]@ir-faosws-1/fcl_2_cpc.csv"
val logData = sc.textFile(logFile.toString, 2).cache()
logData.first()
Upload data
- choose location for data storage in the same region as the account, e.g. the Databricks Community Edition is being hosted in AWS in the US-West-2 (Oregon) region
|  `Clusters / My Cluster`
|--  Spark Cluster UI - Master
|----  Hostname: ec2-50-112-21-230.us-west-2.compute.amazonaws.com
|----  Spark Version: 1.6.1-ubuntu15.10-hadoop1
AWS CLI
- AWS Command Line Interface
- configure user and profiles at
~/.s3cfgand~/.aws/config
S4cmd
Super S3 command line tool
- move multiple files
$ s4cmd mv s3://us-west-2-databricks/ct_tariffline_unlogged_* s3://us-west-2-original/- sync remote folder contents with current dir
$ s4cmd dsync s3://us-west-2-databricks ./
S3cmd
Upload, retrieve and manage data in Amazon S3
- list buckets
s3cmd ls- list bucket contents
s3cmd ls s3://us-west-2-databricks- retrieve file
s3cmd get s3://us-west-2-databricks/faosws/fcl_2_cpc.csv- continue downloading after timeout
s3cmd get --continue s3://us-west-2-databricks/ct_tariffline_unlogged_2008.csv- retrieve whole folder content
s3cmd get --recursive --skip-existing s3://us-west-2-databricks/faosws- remove everything under
s3cmd del --recursive s3://us-west-2-databricks/faosws/fcl_2_cpc.parquet
Manual upload
- download files from Eurostat
- nc200852.7z
nc200952.7z
nc201052.7z
- s3n://us-west-2-databricks/nc200852.dat
- s3n://us-west-2-databricks/nc200952.dat
- s3n://us-west-2-databricks/nc201052.dat
Concepts
Elastic Map Reduce (EMR)
EMR Management Guide
Plan an Amazon EMR Cluster
This section explains configuration options for launching Amazon Elastic MapReduce (Amazon EMR) clusters. Before you launch a cluster, review this information and make choices about the cluster options based on your data processing needs. The options that you choose depend on factors such as the following:
- the type of source data that you want to process
- the amount of source data and how you want to store it
- the acceptable duration and frequency of processing source data
- the network configuration and access control requirements for cluster connectivity
- the metrics for monitoring cluster activities, performance, and health
- the software that you choose to install in your cluster to process and analyze data
- the cost to run clusters based on the options that you choose
Topics
choose the Number and Type of Instances
file Systems Compatible with Amazon EMR
choose the Cluster Lifecycle: Long-Running or Transient
prepare an Output Location (Optional)
configure Access to the Cluster
configure Logging and Debugging (Optional)
select an Amazon VPC Subnet for the Cluster (Optional)
use Third Party Applications With Amazon EMR (Optional)
Training
Big Data on AWS
Developing on AWS
Description
The Developing on AWS course is designed to help individuals design and build secure, reliable and scalable AWS-based applications. In this course, we cover fundamental concepts and baseline programming for developing applications on AWS. We also show you how to work with AWS code libraries, SDKs, and IDE toolkits so that you can effectively develop and deploy code on the AWS platform.
Course Objectives
This course is designed to teach you how to:
- Install and configure SDKs and IDE toolkits
- Automate basic service operations using C# or Java
- Use security models to manage access to AWS
- Understand deployment models and usage with AWS
Intended Audience
This course is intended for:
- Developers
Prerequisites
We recommend that attendees of this course have:
- Working knowledge of software development
- Familiarity with cloud computing concepts
- Basic familiarity with .NET (C#) or Java
- Prior experience with AWS is not required
Delivery Method
This course will be delivered through a blend of:
- Instructor-Led Training
- Hands-on Labs
Duration
- 3 Days
Course Outline
Note: course outline may vary slightly based on the regional location and/or language in which the class is delivered.
This course will cover the following concepts on each day:
Day 1: Getting Started
- Working with the AWS code library, SDKs, and IDE toolkits
- Introduction to AWS security features
- Service object models and baseline concepts for working with Amazon Simple Storage Service (S3) and Amazon DynamoDB
Day 2: Working with AWS Services
- Service object models and baseline concepts for working with the Amazon Simple Queue Service (SQS) and the Amazon Simple Notification Service (SNS)
- Applying AWS security features
Day 3: Application Development and Deployment Best Practices
- Application deployment using AWS Elastic Beanstalk
- Best practices for working with AWS services
Certificates
AWS Certified Developer - Associate
The AWS Certified Developer – Associate exam validates technical expertise in developing and maintaining applications on the AWS platform. Exam concepts you should understand for this exam include:
- Picking the right AWS services for the application
- Leveraging AWS SDKs to interact with AWS services from your application
- Writing code that optimizes performance of AWS services used by your application
- Code-level application security (IAM roles, credentials, encryption, etc.)
Candidate Overview
Eligible candidates for this exam have:
- One or more years of hands-on experience designing and maintaining an AWS-based application
- In-depth knowledge of at least one high-level programming language
- Understanding of core AWS services, uses, and basic architecture best practices
- Proficiency in designing, developing, and deploying cloud-based solutions using AWS
- Experience with developing and maintaining applications written for Amazon Simple Storage Service, Amazon DynamoDB, Amazon Simple Queue Service, Amazon Simple Notification Service, Amazon Simple Workflow Service, AWS Elastic Beanstalk, and AWS CloudFormation.
Exam Overview
- Multiple choice and multiple answer questions
- 80 minutes to complete the exam
- Available in English, Simplified Chinese, and Japanese
- Practice Exam Registration fee is USD 20
-
Exam Registration fee is USD 150
- No prerequisites; recommend taking Developing on AWS
- Click here to review full details in the exam blueprint
- Click here to preview sample questions for the exam